Home
/ How To Make A Mask In Photoshop - Click the t button in the toolbar in the left panel to enter text mode.
How To Make A Mask In Photoshop - Click the t button in the toolbar in the left panel to enter text mode.
How To Make A Mask In Photoshop - Click the t button in the toolbar in the left panel to enter text mode.. Press and hold alt key then bring the cursor between the two layers. In the layers panel, select the highest layer of a pair of layers you would like to group, and choose layer> create clipping mask photoshop. Now, with the mask selected in the layers palette, we grab a soft, black brush and paint out the portions of the fire that we don't want to see. Check out another of my videos: Hold down alt (option in mac os), position the pointer over the line dividing two layers within the layers panel (the pointer changes to two overlapping circles), then click.
Then add a new fill color layer (layer > new fill layer > solid color.) click ok and enter #acc777 when prompted. The icon is of a square with a circle in the middle. One of the greatest or worst things about photoshop is the fact that there are often multiple techniques for achieving the same thing. As we do this, the fire begins to disappear. Click the layer menu item.
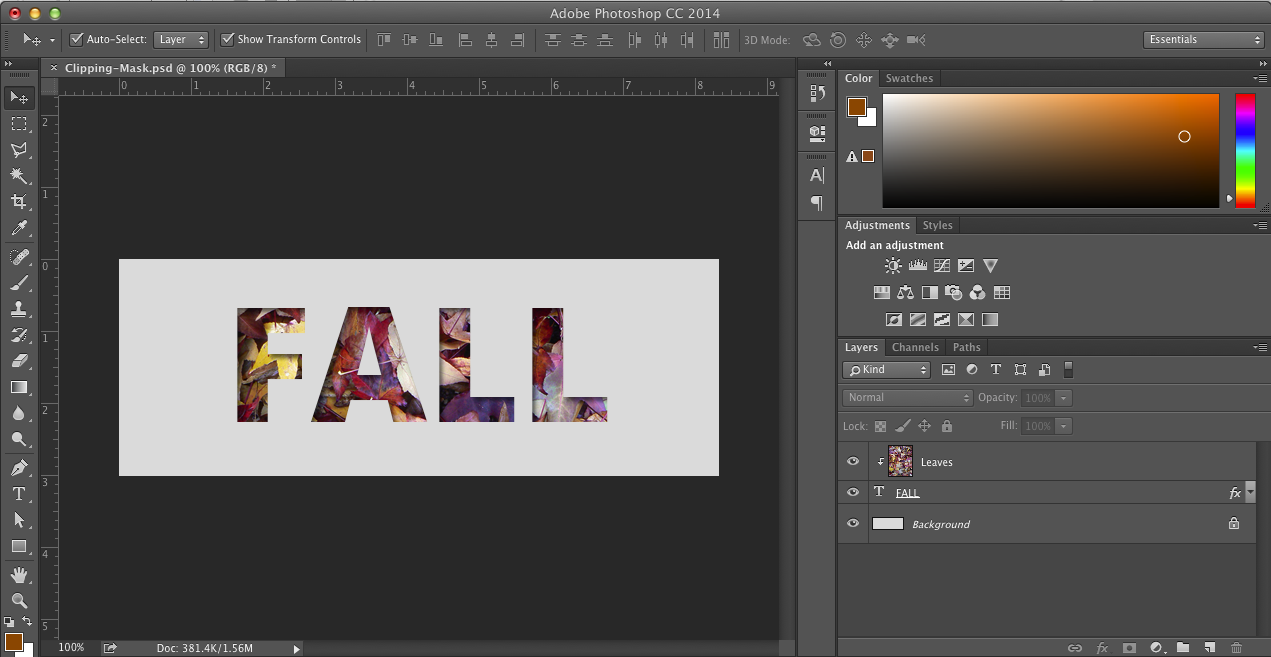
1 from Creating masks is one thing that can be achieved in various different ways and different techniques tend to suit different subjects. Learn what a layer mask is, what they do and how to create a mask in photoshop all in this quick video. And with that layer selected, the surfer, i can move the image around to where i want it. Add straps to the face mask. Yes, at last, we have come to the main topics called clipping mask in photoshop. Now you have to clip mask the layer 1 image onto a duplicate background image, which is now shown as an add layer mask option. You can use this same shortcut to remove clipping masks as well! Select the layer you wish to turn into the mask.
Make sure that you haven't selected a piece of an image.
With the shape selected, click on the add layer mask button found at the bottom of the layers panel, right in the middle. Select the layer you wish to turn into the mask. The handy keyboard shortcut for creating clipping masks in photoshop. There is another way of creating a clipping mask. After doing all the process, the primary stage of clipping mask will start. When cursor changes, click to create a photoshop clipping mask. You can also create clipping masks in photoshop using an easy keyboard shortcut. Photoshop is great software to edit and manipulate your images for better representation and visualization. A white layer mask thumbnail appears on the selected layer, revealing everything on the selected layer. Finally, your clipping mask is completed easily. Step 2 once you click on new or make use of ctrl + n, a dialogue box pops up requring you to fill in the necessary dimensions and specifications you want. The icon is of a square with a circle in the middle. Now you have to clip mask the layer 1 image onto a duplicate background image, which is now shown as an add layer mask option.
Create an alpha channel mask using current options click the new channel button at the bottom of the channels panel. For example, let's create a text clipping mask: Next, upload a background image such as a watercolor background or even a photograph. Make sure that you haven't selected a piece of an image. Then add a new fill color layer (layer > new fill layer > solid color.) click ok and enter #acc777 when prompted.
How To Create A Portrait Mask Illusion With Photoshop from cms-assets.tutsplus.com Click the layer menu item. Open your grass texture in a new document in photoshop. Select the mask option and create the clipping mask for your image. So it might take a bit of adjustment. Hold down alt (option in mac os), position the pointer over the line dividing two layers within the layers panel (the pointer changes to two overlapping circles), then click. Next, upload a background image such as a watercolor background or even a photograph. Learn what a layer mask is, what they do and how to create a mask in photoshop all in this quick video. Place this image on top in the layer panel.
To create the clipping mask, go up to the layer menu in the menu bar and choose create clipping mask:
Click the add layer mask button at the bottom of the layers panel. And that's all there is to it! The handy keyboard shortcut for creating clipping masks in photoshop. Select the font size and style at the top of the app. Click 'mask' and create your clipping mask. A white layer mask thumbnail appears on the selected layer, revealing everything on the selected layer. In the layers section of the photoshop window, click the layer that you want to mask. With the layer mask created, the layers panel now shows the top layer (layer 0) indented to the right, with a small arrow pointing down at layer 1 below it. First let's set up our document, launch photoshop and create a new blank document (size is optional but i'm using 900 x 600 pixels here). Go to layer > create clipping mask. In many cases, using photoshop's select subject or object selection tool is the fastest way to make the initial mask. Click the t button in the toolbar in the left panel to enter text mode. You can also create clipping masks in photoshop using an easy keyboard shortcut.
And with that layer selected, the surfer, i can move the image around to where i want it. Let's create some magic that is called a clipping mask in photoshop. Creating masks is one thing that can be achieved in various different ways and different techniques tend to suit different subjects. You can use this same shortcut to remove clipping masks as well! This will become your clipping mask.
Photoshop Masking Clipping Vs Layering Masks Web Ascender from www.webascender.com In the layers section of the photoshop window, click the layer that you want to mask. I select layer > layer mask > vector mask > current path. Finally, your clipping mask is completed easily. For example, let's create a text clipping mask: And there you go it's done. Add black to a layer mask to conceal By using black and white colors, the layer mask allows revealing and hiding the particular areas of the layer. In the layers panel, select the highest layer of a pair of layers you would like to group, and choose layer> create clipping mask photoshop.
When cursor changes, click to create a photoshop clipping mask.
You can use this same shortcut to remove clipping masks as well! As we do this, the fire begins to disappear. Step 2 once you click on new or make use of ctrl + n, a dialogue box pops up requring you to fill in the necessary dimensions and specifications you want. Hold down alt (option in mac os), position the pointer over the line dividing two layers within the layers panel (the pointer changes to two overlapping circles), then click. One of the greatest or worst things about photoshop is the fact that there are often multiple techniques for achieving the same thing. Right click on the background layer in the layers panel and select layer from background. Once i am happy with the mask, i now need to create a layer mask from the shape i have just made. Click the t button in the toolbar in the left panel to enter text mode. Yes, at last, we have come to the main topics called clipping mask in photoshop. A white box will appear next to your layer icon. Open your grass texture in a new document in photoshop. After doing all the process, the primary stage of clipping mask will start. For clipping mask in photoshop, it's the other way round.